> ## Documentation Index
> Fetch the complete documentation index at: https://docs.utilified.com/llms.txt
> Use this file to discover all available pages before exploring further.
# Managing Connections
> Step-by-step guide to creating and managing connections in UMS — enter the NMI or MIRN, link the connection to a site, add meters, and attach a retail account.
A connection is an individual utility meter point — an electricity `NMI`, a gas `MIRN`, or a water meter reference. This guide walks you through creating a connection and wiring it into the rest of your data: a [site](/sites), its [meters and reads](/meters), and a [retail account](/retail-accounts). For the list view and column reference, see [Connections](/connections).
## Creating a connection
Navigate to the **Connections** page from the sidebar. On the **Connections** tab, click the **+** button in the top-right corner to open the **Create New Connection** drawer.
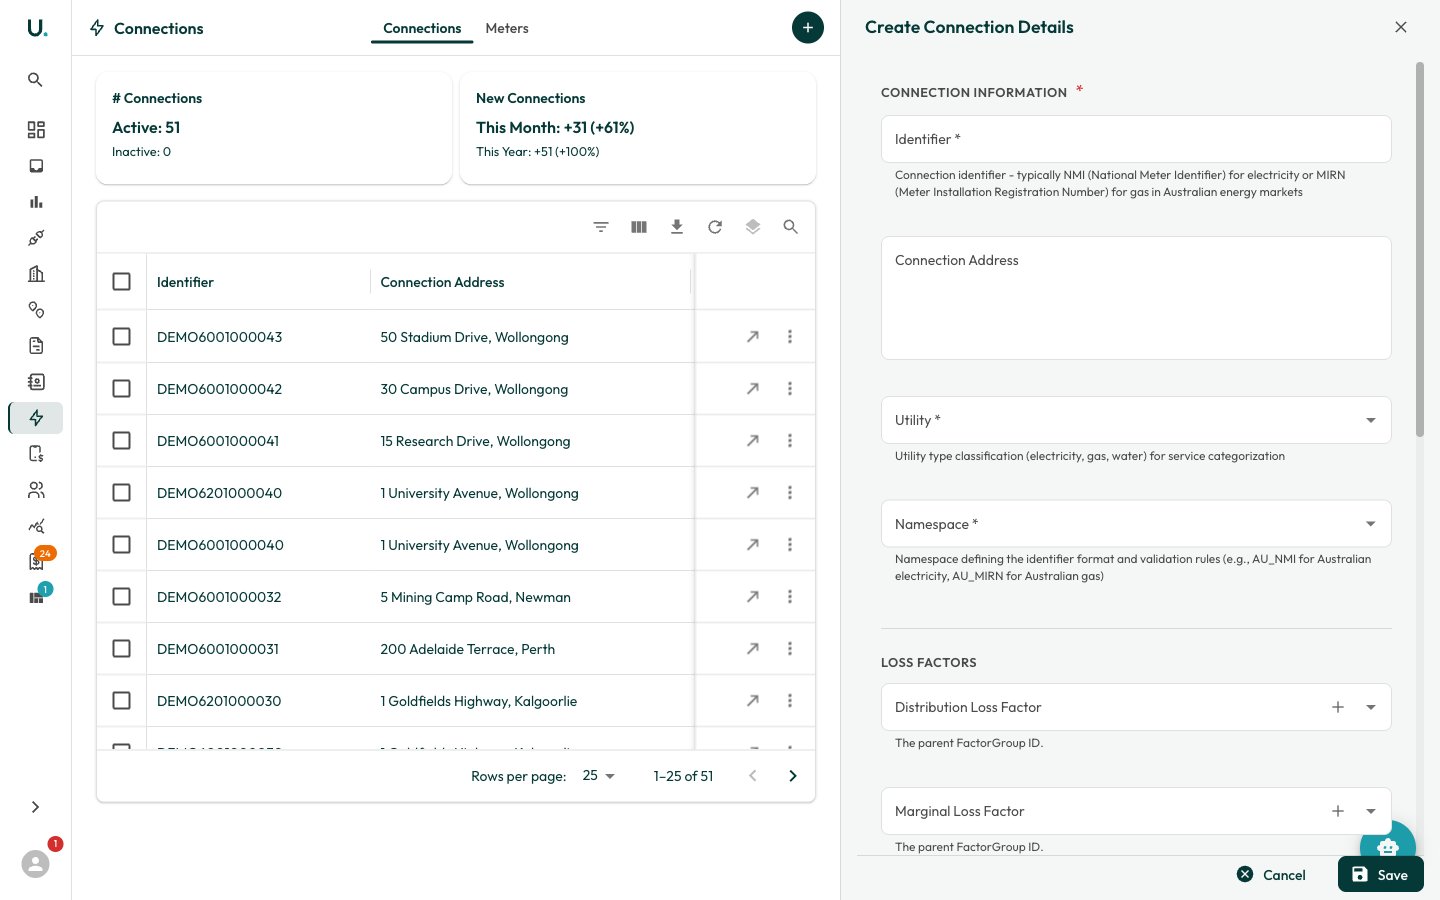 Fill in the **Connection Information** section:
* **Identifier** *(required)* — The meter point identifier: the `NMI` for electricity, the `MIRN` for gas, or the meter reference for water.
* **Connection Address** — The physical address or location of the connection.
* **Utility** *(required)* — Select the utility type (Electricity, Natural Gas, or Water). This drives the consumption units and charting.
* **Namespace** *(required)* — The identifier market or namespace (for example, `AU_DEFAULT` for Australian connections).
Optionally expand the other sections:
* **Loss Factors** — **Distribution Loss Factor** and **Marginal Loss Factor** groups (electricity).
* **Annual Usage** — **Annual Utility Cost**, **Annual Utility Consumption**, and the consumption **Quantity** unit.
* **Dates** — **Date Established** and **Date Abolished**.
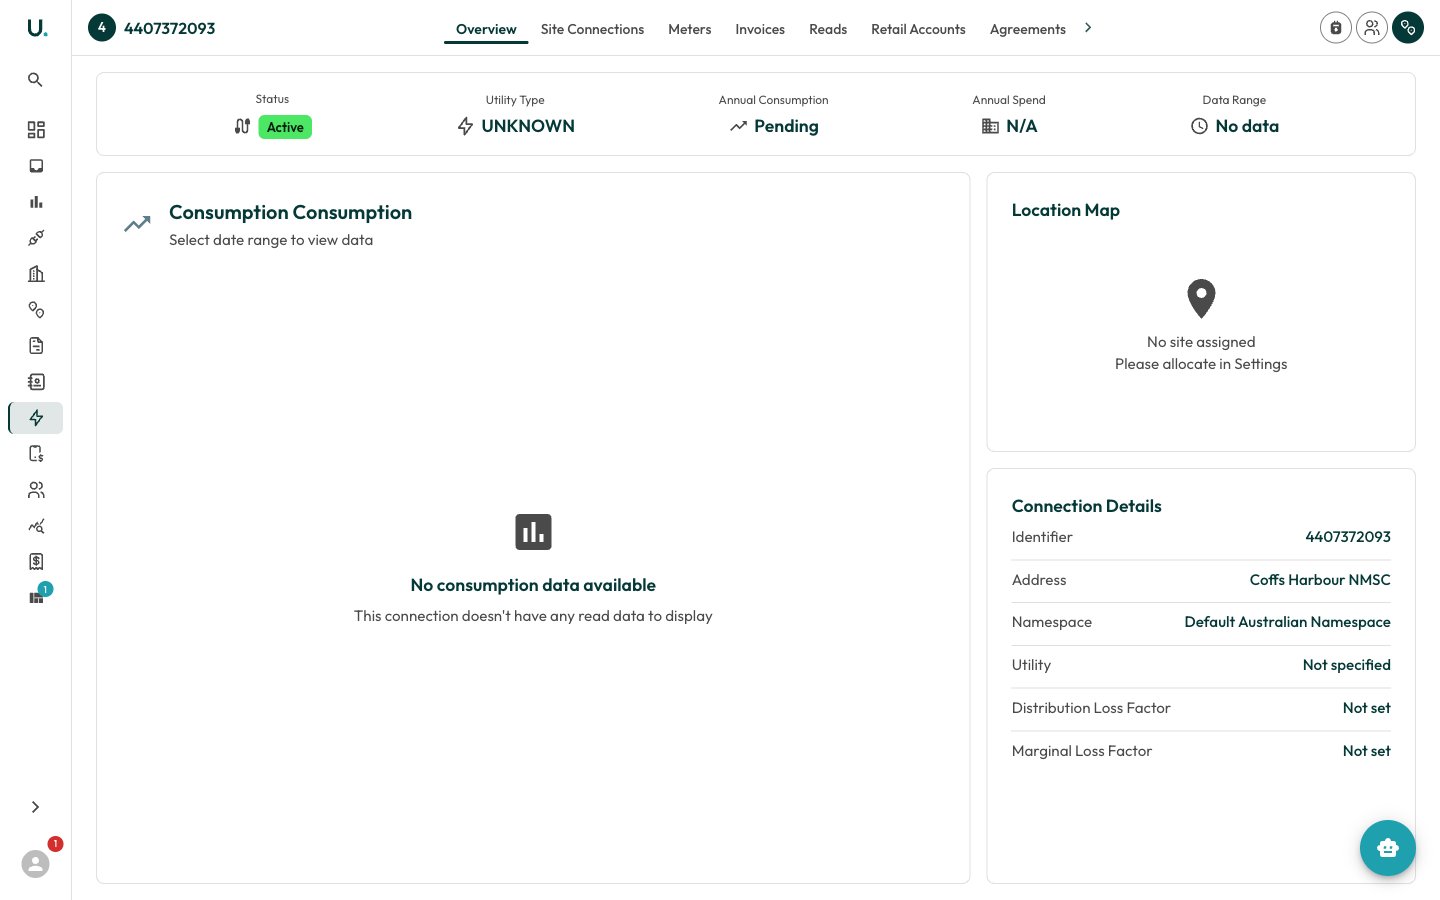
Click **Save** to create the connection. You are taken to its detail page, headed by the identifier, where the remaining steps take place.
Use the right identifier for the utility: a `NMI` (National Meter Identifier) for electricity, a `MIRN` (Meter Installation Reference Number) for gas, and the meter reference for water. The create drawer does not ask for a site — you link the connection to a site as a separate step below.
## Linking, metering, and retail accounts
From the connection detail page, the header actions handle the remaining relationships.
Click **Add to Site** (the primary header action) to open the **Add Connection to Site** drawer, choose the [site](/sites), and save. Once linked, the connection's location appears on the **Overview** map. You can also allocate the site from the **Settings** tab.
Click **New Meter** to add a physical meter to the connection. Each meter has one or more registers (measurement channels) that record the time-series reads. See [Meters, Registers & Reads](/meters) for the full metering hierarchy.
Click **New Retail Account** to record the retailer's account reference for this connection. Retail accounts are how incoming [invoices](/invoices) get matched to the correct connection — see [Retail Accounts](/retail-accounts).
Fill in the **Connection Information** section:
* **Identifier** *(required)* — The meter point identifier: the `NMI` for electricity, the `MIRN` for gas, or the meter reference for water.
* **Connection Address** — The physical address or location of the connection.
* **Utility** *(required)* — Select the utility type (Electricity, Natural Gas, or Water). This drives the consumption units and charting.
* **Namespace** *(required)* — The identifier market or namespace (for example, `AU_DEFAULT` for Australian connections).
Optionally expand the other sections:
* **Loss Factors** — **Distribution Loss Factor** and **Marginal Loss Factor** groups (electricity).
* **Annual Usage** — **Annual Utility Cost**, **Annual Utility Consumption**, and the consumption **Quantity** unit.
* **Dates** — **Date Established** and **Date Abolished**.
Click **Save** to create the connection. You are taken to its detail page, headed by the identifier, where the remaining steps take place.
Use the right identifier for the utility: a `NMI` (National Meter Identifier) for electricity, a `MIRN` (Meter Installation Reference Number) for gas, and the meter reference for water. The create drawer does not ask for a site — you link the connection to a site as a separate step below.
## Linking, metering, and retail accounts
From the connection detail page, the header actions handle the remaining relationships.
Click **Add to Site** (the primary header action) to open the **Add Connection to Site** drawer, choose the [site](/sites), and save. Once linked, the connection's location appears on the **Overview** map. You can also allocate the site from the **Settings** tab.
Click **New Meter** to add a physical meter to the connection. Each meter has one or more registers (measurement channels) that record the time-series reads. See [Meters, Registers & Reads](/meters) for the full metering hierarchy.
Click **New Retail Account** to record the retailer's account reference for this connection. Retail accounts are how incoming [invoices](/invoices) get matched to the correct connection — see [Retail Accounts](/retail-accounts).
 Electricity, gas, and water connections are managed the same way, but their consumption units differ — kWh for electricity, MJ for gas, kL for water. The **Utility** you select on creation sets these automatically.
## Connection detail tabs
The detail page organises everything about a connection into tabs:
| Tab | What it's for |
| ---------------------- | --------------------------------------------------------------------------------------------- |
| **Overview** | Status, utility type, annual consumption and spend, a consumption chart, and the location map |
| **Site Connections** | The site links for this connection |
| **Meters** | The physical meters installed at the connection — see [Meters](/meters) |
| **Invoices** | Invoices billed against this connection |
| **Reads** | Aggregated time-series consumption reads, with charting and CSV export |
| **Retail Accounts** | The retailer account references attached to this connection |
| **Agreements** | The energy [agreements](/agreements) covering this connection |
| **Quantity Constants** | Conversion constants applied to this connection's quantities |
| **Settings** | Edit connection details and allocate the site |
The **Meters** tab is the entry point into the metering hierarchy — meters, their registers, and the reads beneath them. See [Meters, Registers & Reads](/meters) for how that structure fits together.
Electricity, gas, and water connections are managed the same way, but their consumption units differ — kWh for electricity, MJ for gas, kL for water. The **Utility** you select on creation sets these automatically.
## Connection detail tabs
The detail page organises everything about a connection into tabs:
| Tab | What it's for |
| ---------------------- | --------------------------------------------------------------------------------------------- |
| **Overview** | Status, utility type, annual consumption and spend, a consumption chart, and the location map |
| **Site Connections** | The site links for this connection |
| **Meters** | The physical meters installed at the connection — see [Meters](/meters) |
| **Invoices** | Invoices billed against this connection |
| **Reads** | Aggregated time-series consumption reads, with charting and CSV export |
| **Retail Accounts** | The retailer account references attached to this connection |
| **Agreements** | The energy [agreements](/agreements) covering this connection |
| **Quantity Constants** | Conversion constants applied to this connection's quantities |
| **Settings** | Edit connection details and allocate the site |
The **Meters** tab is the entry point into the metering hierarchy — meters, their registers, and the reads beneath them. See [Meters, Registers & Reads](/meters) for how that structure fits together.