> ## Documentation Index
> Fetch the complete documentation index at: https://docs.utilified.com/llms.txt
> Use this file to discover all available pages before exploring further.
# Setting Up a User
> Invite a new team member to your UMS organisation, assign their role and permissions, and manage existing users from the Settings area.
This guide walks you through inviting a new user to your UMS organisation and assigning their access. Inviting and managing users requires administrator permissions — if you don't see the **Users** section in the Settings nav rail, contact your organisation administrator.
## Open user management
User management lives in the **Users** section of Settings, under the **Organisation** group in the left nav rail.
Click your avatar in the top-right corner and select **Organisation**.
In the left nav rail, select **Users** under **Organisation**.
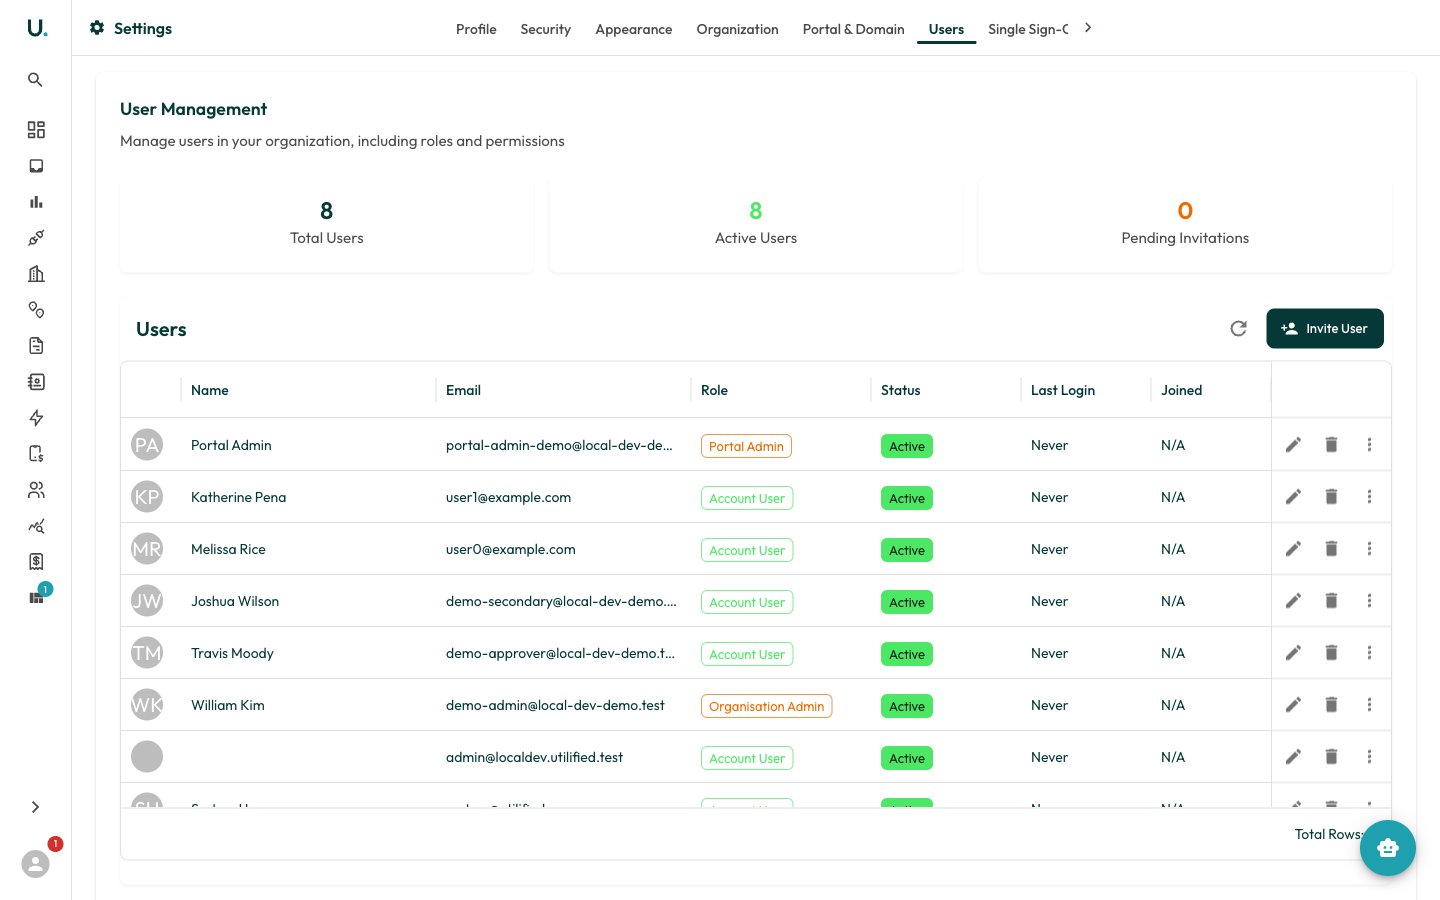 The Users section shows three summary cards — **Total Users**, **Active Users**, and **Pending Invitations** — above a table of everyone in your organisation, with their role, status, and last login.
## Invite a new user
Click **Invite User** in the top-right of the Users card. This opens the **Invite New User** wizard.
On the **User Details** step, enter the new user's **First Name**, **Last Name**, and **Email Address**. The invitation is sent to the email address you enter here. **Phone Number** is optional.
The Users section shows three summary cards — **Total Users**, **Active Users**, and **Pending Invitations** — above a table of everyone in your organisation, with their role, status, and last login.
## Invite a new user
Click **Invite User** in the top-right of the Users card. This opens the **Invite New User** wizard.
On the **User Details** step, enter the new user's **First Name**, **Last Name**, and **Email Address**. The invitation is sent to the email address you enter here. **Phone Number** is optional.
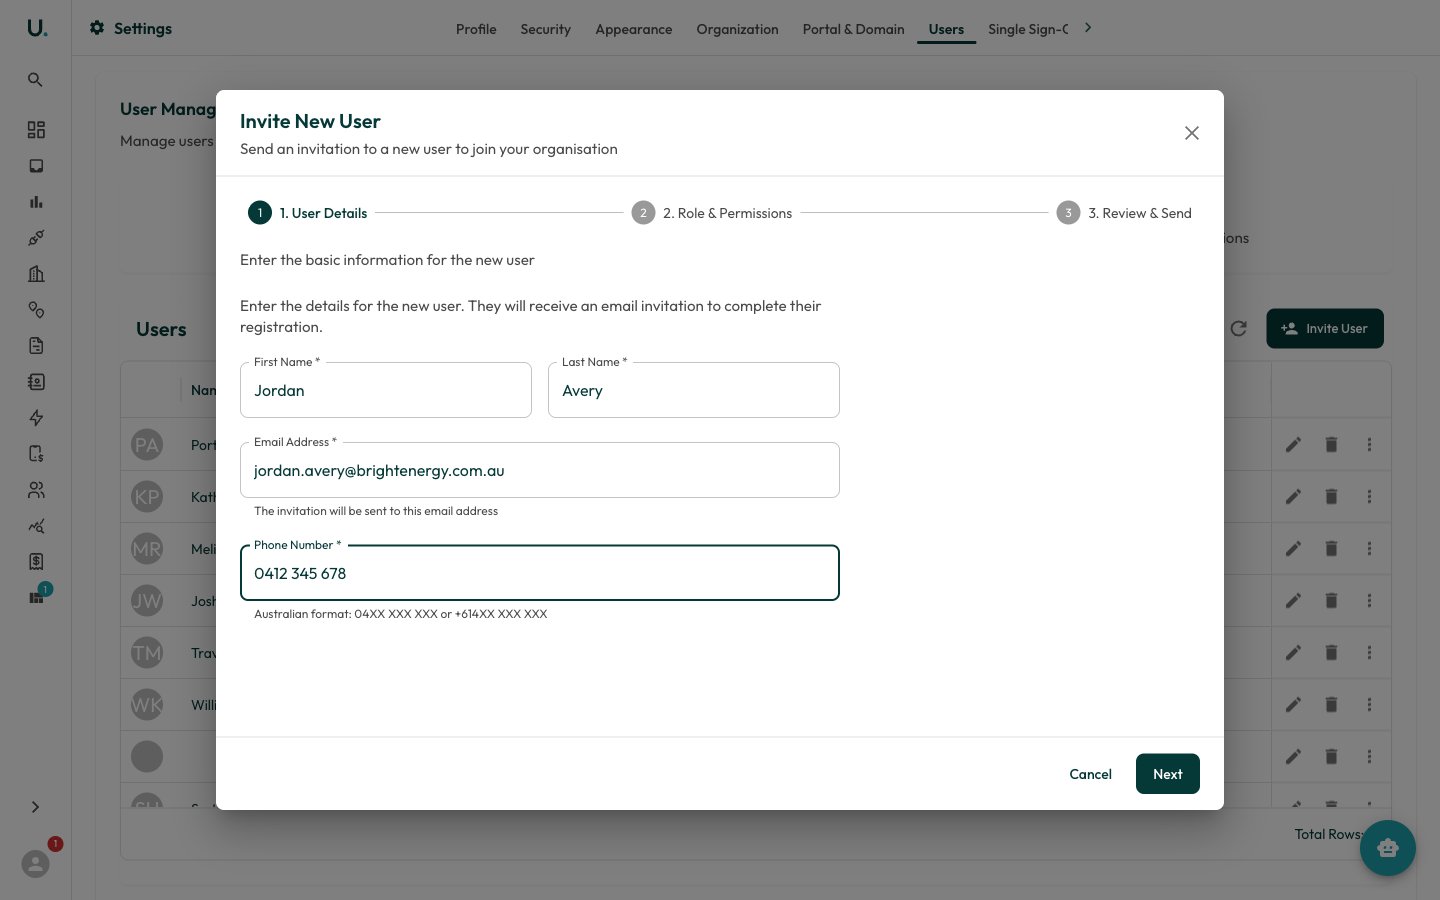 If you enter a phone number, Australian format is preferred — `04XX XXX XXX` or `+614XX XXX XXX`.
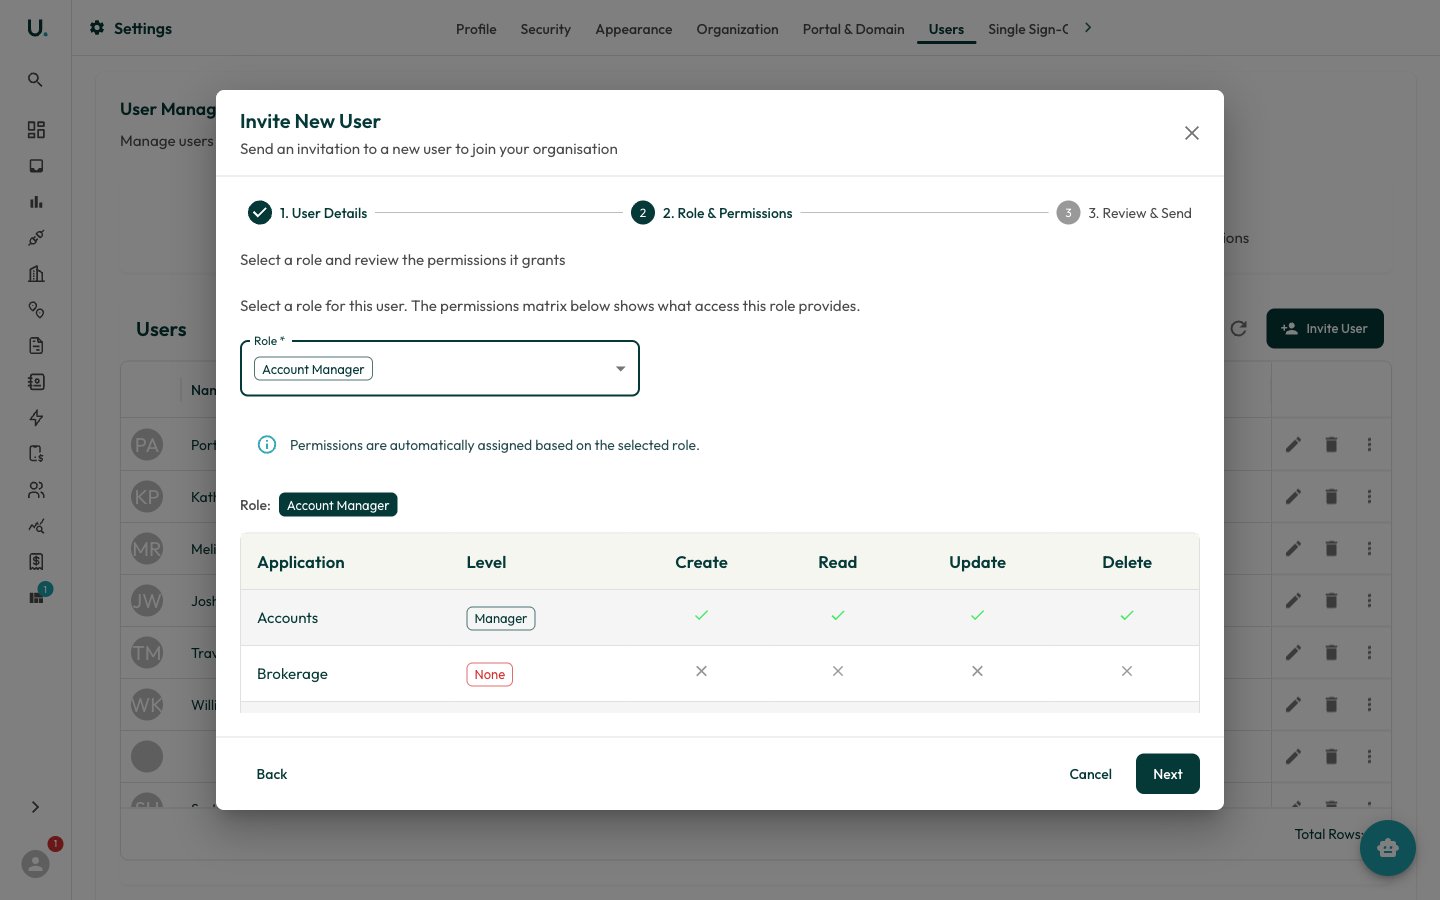
Click **Next** to move to **Role & Permissions**, then pick a role from the curated **role cards**. The list is filtered to your own privilege level — you can only invite users at or below your role (Superuser and above are never offered). The permissions preview shown next to each card is fetched from the backend, so it always reflects what the role can actually create, read, update, and delete across each application.
If you enter a phone number, Australian format is preferred — `04XX XXX XXX` or `+614XX XXX XXX`.
Click **Next** to move to **Role & Permissions**, then pick a role from the curated **role cards**. The list is filtered to your own privilege level — you can only invite users at or below your role (Superuser and above are never offered). The permissions preview shown next to each card is fetched from the backend, so it always reflects what the role can actually create, read, update, and delete across each application.
 If the role you picked is account-scoped — **Portal Admin**, **Portal User**, **Account User**, or **Account Viewer** — the wizard adds an **Account Access** step where you choose the account(s) the user should be scoped to. This step is skipped for organisation-wide roles. It's the same picker that appears on the **Account Access** tab of the edit dialog for existing users.
Click **Next** to reach **Review & Send**. Check the summary, then click **Finish** to send the invitation. The new user receives an email to complete their registration and set a password.
If a required field is missing or invalid when you submit, the wizard jumps back to the step that owns the field and highlights the error inline — you don't have to hunt through earlier steps.
## User roles
The role you choose controls what the user can access. UMS provides the following roles:
| Role | Typical use |
| ---------------------------------- | ----------------------------------------------------- |
| **Organisation Admin** | Full administrative access, including user management |
| **Account Manager** | Manage accounts, sites, connections, and agreements |
| **Account User** | Day-to-day work within assigned accounts |
| **Account Viewer** | Read-only access to assigned accounts |
| **Account Operations User** | Operational tasks such as invoice processing |
| **Brokerage Operations User** | Brokerage records and calculations |
| **Portal Admin** / **Portal User** | Access to a white-label portal account |
Only roles at or below your own privilege level appear as cards in the wizard.
## Manage existing users
Each row in the users table has actions for managing that user:
* **Edit user** — Update their name, role, **Active** status, and which accounts they can access (on the **Account Access** tab, which uses the same picker as the wizard's Account Access step).
* **Resend invitation** — Re-send the registration email to a user whose invitation is still pending.
* **Deactivate user** — Revoke access immediately without deleting the account. Use **Reactivate user** to restore it.
* **Delete user** — Permanently remove the user. This cannot be undone.
A user with a pending invitation shows a **Pending Invitation** status until they complete registration, after which they appear as **Active**.
If the role you picked is account-scoped — **Portal Admin**, **Portal User**, **Account User**, or **Account Viewer** — the wizard adds an **Account Access** step where you choose the account(s) the user should be scoped to. This step is skipped for organisation-wide roles. It's the same picker that appears on the **Account Access** tab of the edit dialog for existing users.
Click **Next** to reach **Review & Send**. Check the summary, then click **Finish** to send the invitation. The new user receives an email to complete their registration and set a password.
If a required field is missing or invalid when you submit, the wizard jumps back to the step that owns the field and highlights the error inline — you don't have to hunt through earlier steps.
## User roles
The role you choose controls what the user can access. UMS provides the following roles:
| Role | Typical use |
| ---------------------------------- | ----------------------------------------------------- |
| **Organisation Admin** | Full administrative access, including user management |
| **Account Manager** | Manage accounts, sites, connections, and agreements |
| **Account User** | Day-to-day work within assigned accounts |
| **Account Viewer** | Read-only access to assigned accounts |
| **Account Operations User** | Operational tasks such as invoice processing |
| **Brokerage Operations User** | Brokerage records and calculations |
| **Portal Admin** / **Portal User** | Access to a white-label portal account |
Only roles at or below your own privilege level appear as cards in the wizard.
## Manage existing users
Each row in the users table has actions for managing that user:
* **Edit user** — Update their name, role, **Active** status, and which accounts they can access (on the **Account Access** tab, which uses the same picker as the wizard's Account Access step).
* **Resend invitation** — Re-send the registration email to a user whose invitation is still pending.
* **Deactivate user** — Revoke access immediately without deleting the account. Use **Reactivate user** to restore it.
* **Delete user** — Permanently remove the user. This cannot be undone.
A user with a pending invitation shows a **Pending Invitation** status until they complete registration, after which they appear as **Active**.